
How to Install Pegboard on Drywall — No Damage, No Drill Required

Installing a pegboard on drywall can be frustrating—especially when you’re a renter or don’t have access to tools. Maybe you’ve tried anchors, screws, even double-sided tape… and it just doesn’t feel right.
So what’s the real solution?
In this guide, we’ll walk you through:
-
Why traditional drywall mounting doesn’t work for most people
-
How to install pegboard without drilling
-
How KOKOPEGBOARD lets you mount full-size pegboards without touching your walls
-
Visual guides from our official instruction manual + side/front/top views
📌 Bonus: We’ll also show how to turn your setup into a next-level gaming room with accessories and organization tips.
👉 Official site: www.kokopegboard.com
🧱 The Problem with Installing Pegboard on Drywall
Most guides will tell you to:
-
Find studs
-
Use wall anchors or toggle bolts
-
Drill several holes
-
Hope your hooks don’t tear through the drywall
That’s a problem for:
-
Renters
-
People with limited tools
-
Minimalists who want flexibility
-
Gamers and creators who move gear often
✅ The Smarter Way: Install Pegboard Without Drilling
KOKOPEGBOARD is a freestanding, floor-supported metal pegboard system—so you don’t need to drill into anything.
Instead of screwing into drywall, you:
-
Set two vertical columns on the ground
-
Slide the pegboard panels into the columns
-
Add shelves, hooks, and accessories
-
Done in 6 minutes — no damage, no stress
🧰 What’s Included in the System
Each KOKOPEGBOARD set comes with:
-
Detachable steel vertical columns
-
Pegboard panels (height 190cm)
-
Base feet
-
Pegboard shelf (depth 27cm)
-
Hooks & cable organizers
-
iPad hook ×3
-
Velcro + 5 customizable pegboard pegs

🛠️ Who Should Use This Setup?
Ideal for:
-
Renters (no wall damage)
-
Dorm room gamers
-
Creators who rearrange often
-
Home offices
-
Streamers needing vertical storage
-
DIY fans who want pegboard accessories without drilling
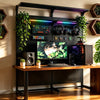
🎮 From Drywall to Dream Room
Once installed, your pegboard gaming setup can include:
-
🎧 Headset and controller storage
-
📱 iPad or tablet mount
-
💡 RGB light strips
-
🧺 Hanging gaming room trash can
-
📦 Shelf for Switch/console/speakers
-
🎮 Mount monitor using pegboard bracket (coming soon)
And the best part: You can move it anytime.
🔧 Install in 6 Minutes — See the Official Steps
📷 [Insert your official step-by-step install image here]
Key visual steps:
-
Position feet + vertical columns


-
Snap in pegboard panels

-
Secure shelves & add hooks
-
Customize with accessories
-
Plug in lighting or use magnetic add-ons
🧩 Recommended Accessory Kits
🎮 Accessory Pack A ($89)
-
Black shelf (no edge)
-
Diamond pegboard basket
-
5-claw hook shelf
-
Small basket
-
iPad hook ×3
-
5 small hooks ×3
🎮 Accessory Pack B ($139)
-
Magnetic tissue box
-
Divided pen holder
-
Magnetic basket
-
Cat-shaped glasses case
-
iPad hook ×3
-
Morandi magnetic clips ×9
🎁 Free gift: All purchases come with iPad hooks, cable organizer, 5 pegs, and Velcro.
📦 Order Today with Free Global Shipping
No wall damage. No tools. No stress.
Just plug, play, and enjoy your dream setup.


